Jan 25, 2011

Hairstyles


Sooooo, I'd like to do something with my hair, but am out of ideas. Sounds familiar? I decided to make a list of lolita-suitable hairstyles, with pictures and tutorials. These are all styles I have made and worn myself. My hair is long, about to my waist or hips and it's always been so, so I dont have much ideas for a short-haired lolita, but all of these styles can be made if your hair is to your shoulder blades or longer. Remember to always add heat protection to your hair! Also, making different styles is much easier if you first apply styling foam or something similar. Clean hair with no styling products is usually very slippery and thin-looking. But to the styles now:

Of course, the most common hairstyle with lolita is curls. Whether tight sausage curls, loose princess curls, messy braid curls or anything in between, these hairstyles can be seen almost in every picture of a lolita there is. Curls match to every style there is and are very variable. Lots of tutorials for making curls can be found. I recommend YouTube for this, type "curl making hair tutorial" and you will find tons.


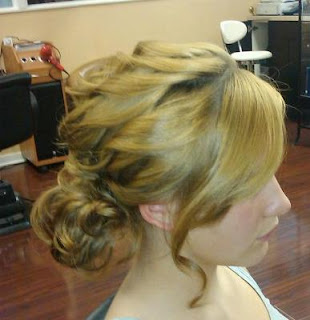
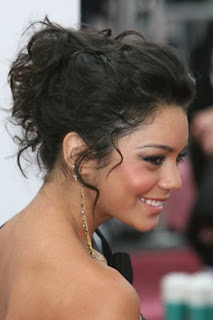
You have your curls, you wear them, then go to bed and the next morning they are still there. Someone might be lucky and have them nice enough for wearing the second day. If not, a bun or a pile might be a nice style. To create a pile, collect all your hair on top of your head, twist the roots tightly and secure with hairpins (you can also use a rubber band instead of twisting). Then tease your hair a little and secure random curls around your head to create an effortless-looking style.

Another popular lolita style, especially for sweet lolitas, are pigtails. These are very variable too, and can be made with shorter hair too. Here is a very good tutorial for the most common sweet lolita curly pigtails -style. Here are some inspirational pictures:


All kinds of French twists are very becoming especially for classic lolitas. I would recommend making a twist horizontally and placing it low near your neck. To make a twist, tease all your hair a lot, then simply roll it to a place and secure with hairpins and a lot of hairspray. Would look especially beautiful if decorated with flowers (and they can also be used to cover some of the not-so-smooth parts of your twist - I do this all the time :D)


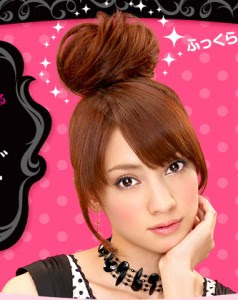
Basic buns are always a good choice: they are easy but give a sophisticated look. Big buns look great when decorated with a bow. Here is the basic tutorial. You can easily variate this style by moving the bun up and down, placing it left or right, making two buns and adding decorations.


Braids are a classic too. Be it one or two, French or normal ones, they are great for classic styles. Don't forget the second-day curls you can get! Here is my quick drawn tutorial for a forehead plait. (Forgive me the ugly faces, my little sister is the artistic one in the family.)


So, to do this, first separate your hair close to one of your temples. Then take two sections (1) and take the lower one over the upper one (2). Take a third section (3) and take over the now middle one. Then again take the lowest one and take over the middle one (4). Now comes the twist! When again taking the highest one to take over the middle one, add some free hair to the highest section (5). Repeat this until you reach the place you wish. Every time take just the lowest section to the middle and then the highest and some of the free hair with it and repeat and repeat and repeat... You got it. When you are about to reach your ear you might notice that your braid is somewhere close to your chin. This might look nice too, but if your intention is to have the braid with tied hair, then it's better to be careful and keep the braid tight.

(I had extra space, thus the heart ^^;)

The forehead plait can also be done with just two sections of hair. Here you can find a tutorial for that. Remember to check binosusume's other tutorials too, she is brilliant.

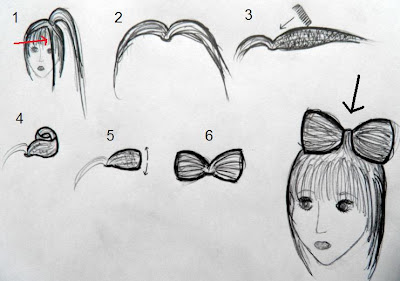
I saved my personal favourite to be the last: hair bow! Everybody knows it, right? Lady Gaga and Poker Face... Also originally from binosusume, but nowadays I make it bit differently as I find my way easier. Here again a drawn tutorial.


First tie your hair to where you wish your bow to be (1). If you've got lots and lots of hair it probably looks the best placed on top of your head. A smaller bow looks best when placed to right or left. When tying your hair, leave a strand free in front of your ponytail (see the red arrow). Then separate the ponytail into two (2). You might want to clip the other side down to prevent it from mixing to the other one. Take your section and tease it from roots to ends (3). Be thorough so you'll get enough volume. Then carefully comb the hairs to create a smooth surface. Just a little so you won't unfold it! You can also use hairspray or wax for this. When you are ready, roll the whole section (4) and pin down to the size of your wishing. Then "open" the bow with your fingers (5) to create fullness and use more hairpins to secure. Repeat to the other section, and you'll get a nice bow! (6) Now remember the section left out in the first step? Use it to cover the middle part of your bow and pin the rest of it inside one of the bow loops. Hairspray! The backside of the bow seldom looks very pretty, I usually cover it with a flower hairpin. This might take a couple of times to master, but is not really very difficult :)

Binosusume's tutorial can be found here.

Whoo, that was a whole lot of hair! Hope this was helpful ^^

Until next time,
Giselle
Jan 20, 2011

Casual Lolita


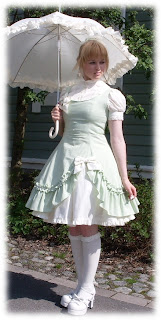
This was my outfit to school today. I never wear full lolita to school, it's too difficult and time-consuming. And I really don't feel like sweeping someone's plate in cafeteria with my skirt with extra-poofy petticoat. Actually, mostly I wear something completely normal and non-lolita. But today I felt like wearing something cute. The skirt is from Bodyline, everything else is self-made or H&M or such. (Sorry for the stain on the mirror, I do wear a headdress too.)

So, the problem with casual is to wear something that's not going to visit in your classmate's pea soup while you pass her table but still is lolita. These might be self-evident, but here are my tips for a casual look:

1: The Easiest Way

Like I did with my outfit. Wear a cute skirt with everything else simple. Wear matching colours, maybe small accessories. A simple hairstyle - though "simple" does not mean "do nothing".

2: The Elegant Way

This might not be so clearly lolita, but if you feel wearing something beautiful but can't or don't want have your petticoats along, then you might want to wear a nice lolita blouse with normal skirt or pants. The problem with this is that one easily looks just overdressed so be sure to have something different. A good coordination could be a cute blouse with lace trimmings, lolita style boots and jeans, trouser legs inside the boots. Hair in a big messy bun, backcombed to look wild.

3: The Undetected Way

If you don't feel comfortable wearing big, colourful skirts or full-of-lace -blouses, simplify it more. Wear normal clothes together with lolita-ish shoes, put on a small hairbow and an ice-cream necklace. Or a one-coloured, little bit poofy skirt with everything else normal.

In my opinion the most important parts of a lolita outfit are a petticoat and one's hair. A lolita skirt is meant to be worn with a petticoat, if worn without it just tends to look like something was forgotten. So if you wear a skirt, wear a petti too! Even a small one, like I did in the picture. Then about hair: there's a big difference between "leaving your hair free" and "wash-and-go". I had my hair free today, but I blowdried my bangs with styling foam and then flat-ironed it. This took about 5 minutes, but the outcome is radically better. So even when wearing your hair simple, be sure to pay some attention to it. And whatever you wear, remember to be happy about your outfit and the time you spent choosing it <3

Until next time,
Giselle

Jan 19, 2011

Pink Cupcakes


So, I decided to bake cupcakes. I love baking and, unfortunately, eating what I've baked ^^; Cupcakes are especially nice to make as they are easy and there are tons of variations. These were raspberry and chocolate with pink frosting. Here's the recipe if you want to try them, I try to explain it so even if you have no baking experience before, you can do this!

for 12 small cupcakes:

4 1/2 dl flour
2 1/2 teaspoons baking powder
4 tablespoons cocoa powder (not cocoa drink powder)
2 dl sugar
3 dl raspberries (frozen or fresh)
2 eggs
3 3/4 dl buttermilk
90 grams butter, melted

frosting:
100 grams butter (soft)
100 grams cream cheese
2 dl strawberry-flavored powdered sugar (if not available, use normal powdered sugar - I used the strawberry one just to have the pink colour ^^)

If you are using cups instead of desilitres, here's a help.

Heat the oven to 210 celsius degrees. Have your cupcake liners nearby, if using the normal ones you might want to have two of them together so they don't unfold in the oven so easily. If you have the ones with a folding, feel that yours are sturdy enough anyway or are using a cupcake mold, then worry not.

Mix together flours, baking powder and cocoa powder, then add sugar and raspberries. If your raspberries are fresh, then be careful while mixing. The frozen ones are easier to handle. Then in another bowl, mix eggs and buttermilk. Add the liquid to the flour mix, then add melted butter. Mix, but not too much or you'll get chocolate dinner rolls instead of cupcakes. Scoop the batter into the liners, about 3/4 full. Small liners should be sized about 1 1/4 dl when completely filled. Bake your cupcakes in the oven for 20 minutes. While they are in the oven, make the frosting. It's easy, just mix all the ingredient together. Be sure to use soft, room-temperature butter or it won't mix evenly with cream cheese. Put your frosting in the fridge. When the cupcakes are ready, let them cool down or your frosting will melt. To spread the frosting, you can use a piping bag like I did, or just spread it with a spoon. Enjoy with a cup of tea and a good friend!

If you wish to find more delicious and interesting cupcake recipes, visit Cupcake Bakeshop. All the cupcakes you've ever imagined will be there!

What is your favourite treat? Please share with me!

Until next time,
Giselle
Jan 17, 2011

The Meetup


So, as I told before, on Sunday I participated in a meetup. This is my attire, simple grey skirt with fake fur trimming and a round-collared blouse with pearl buttons (that were hell to sew on) and lace on collar, front and cuffs. As the meetup theme was "frost flowers" and we were asked to wear something with flowers, I decorated my hair with lots of white rose hair pins. (Forgive my ugly-coloured door...)

The plan was to first have a photoshoot and then go to a cafe. As it was freezing (almost -15 celcius), we quickly moved to the cafe, but I hope we had some nice photoes. The cafe was a nice place called "Nostalgia". I had a pink doughnut, very lolita indeed <3 Everybody was totally lovely and I wish to meet with them again. The hostesses had drawn everybody a card as a thank-you. They were so cute!! Mine looked like this:


As I had such a great time, I started planning on hosting my own meetup. I'd love to have a tea party meetup. Even though it's the most common idea associated with lolitas, in reality those kind of meetups are very rare. Maybe because nobody actually owns a pretty tea set, at least one suitable for more than four people. Also, in Finland there are no tea houses or such to order a tea party at. But my mother has this lovely blue-coloured tea set! Every cup and plate is a little bit different from others but all white with blue decorations. I love them! Maybe if mixed a bit more, I could host a Mad Hatter tea party. I'd love it <3

Another dream meetup of mine would be a picnic at an old graveyard. One can't just select a random graveyard and go to have a picnic, that's really not appropiate. But we have this 200 years old graveyard, not used in, like, 150 years in my city. All the graves are beautifully decorated and located here and there, not in rows like nowadays. And as it is an open park, it's a totally acceptable place for a picnic. And as the graves are really pretty, it would make a nice place for a photoshoot too.

If you have a nice meetup idea, please share it with me!

Until next time,
Giselle
Jan 12, 2011

Lots of Lace

Hello!

So, yesterday was my pay day, and I went shopping! As I told before, I was planning on buying some fabric for a new blouse. So I did. I also bought pearl buttons and some lace. Here they are:

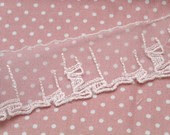
The lace is about 2cm wide and good for a blouse. But. I would have wanted something a bit wider, closer to 5cm, as I was planning on making a big, round-edged collar with lace trimming. As the collar is going to be wide, I'm afraid a thin lace like this will be a bit off-balanced. However, this lace was the only one in my local store that was both soft-looking and priced below 5€/m.

For me, this is a problem I face every time I plan on using lace. As I refuse using "plastic" lace and mostly need off-white or cream coloured ones instead of bright white, my choices are limited. Recently I've been turning to the internet while searching for beautiful laces.

The place to look for craft supplies is, of course, Etsy. Here are some beautiful laces I came upon:


I'm surely going to order that pink cotton lace for a summer JSK I'm going to make! And the one with music notes (even though they are mirrored :D) is absolutely adorable, I'd love to use it, even though I'm not a black-colour-wearing person. All these are adorable <3 If you wish to buy these laces, here are they: music notes, pink cotton and pink embroidery. Prices for these three are between 0,85€ and 1,50€ per meter, plus postal fees around 3€. So, next time, when my clothes are not due next Sunday, I'm surely going to order the lace I need, as I can find more beautiful ones at lower prices. If you know any good lace suppliers, please tell me!

Until next time,
Giselle

Jan 10, 2011

Let's get started


Hello!

I've been about to start this blog since, hmm, forever. I was just facing some minor problems, like "no name" and "no ability to make layouts". But here we are, finally!

First, some information about me: I'm a Finnish university student, recently quite disinterested in studying. I also work part-time and go in for horseback riding lessons. I've been interested in Japanese culture for years, since junior high. I've cosplayed for a few years and a little by little I found myself falling in love with lolita fashion. I love especially all "traditional" styles, sweet, gothic and classic, but as I've always preferred wearing light colours, my own style is a mixture of sweet and classic, mostly a casual version of these two.

With my clothing, I'm always on a budget - for a lolita, anyway! Even though I love Mary Magdalene and Angelic Pretty, there is no way I'm going to pay hundreds of €uros for a dress. As I am a decent seamstress myself, I prefer self-made clothes. They also fit me better than those "one size fits all - or not" -brand clothes. I also admit buying print replicas now and then. For me, the most important piece of a lolita outfit is a PETTICOAT and I think no lolita should go out without one. Or two. Or a whole lot, so your skirt will truly be bell-shaped...!!

A newbie in the internet community, I'm trying to find my way into it, as well as to the local lolita community. My first lolita meetup is on next Sunday! Last week, I made a skirt with fake fur trimming, and tomorrow I'll go and buy some cotton to make a new blouse to wear to the meetup. I'll try to have a nice picture of my outfit!

Until next time,
Giselle